
Wiki › Worlds and levels
Worlds and levels
25 levels: Green Lands and Castle Road. Your goal: defeat Thorn Guard and free Boombaland from his thorns.
Every level has four difficulties: Easy, Normal, Hard and Impossible. Pick Easy or Normal. Win a level to open Hard mode, then Impossible mode. Stars show how well you did: one for a win, one for a win without a hit, one for the level's goal.
| # | Level | Where | Third star | Boss and specials |
|---|---|---|---|---|
| 1 | It All Starts with a BOOM | Green Lands | Collect 1 power-ups | – |
| 2 | Crumbly Cliffs | Green Lands | Destroy every crate | – |
| 3 | Bramble Crossing | Green Lands | Reach a total score of 5,500 | – |
| 4 | Slip-Slide Ring | Green Lands | Win using at most 15 bombs | – |
| 5 | The Big Hatch | Green Lands | Win within 120 seconds | Thorn Guard |
| 6 | Rising Bridges | Green Lands | Reach a total score of 6,000 | – |
| 7 | Lobber's Loop | Green Lands | Destroy every crate | – |
| 8 | Wobble Bridge | Green Lands | Win using at most 20 bombs | – |
| 9 | Bridge of Bombs | Green Lands | Reach a total score of 6,000 | – |
| 10 | Shield of Thorns | Green Lands | Win within 150 seconds | Thorn Guard |
| 11 | Leap of Faith | Green Lands | Win using at most 16 bombs | – |
| 12 | Rolling Meadow | Green Lands | Reach a total score of 6,500 | – |
| 13 | Ring by Ring | Green Lands | Win within 150 seconds | – |
| 14 | Raise the Bridge | Green Lands | Destroy every crate | – |
| 15 | Airship Attack | Green Lands | Collect 5 power-ups | Airship |
| 16 | Pond Gates | Green Lands | Reach a total score of 6,500 | – |
| 17 | Flip-Flop Lanes | Green Lands | Win using at most 18 bombs | – |
| 18 | Drawbridge Keep | Green Lands | Win within 140 seconds | – |
| 19 | Tower Road | Green Lands | Reach a total score of 7,500 | – |
| 20 | Tower of Rage | Green Lands | Win within 270 seconds | Thorn Guard, Rage Tower, Airship |
| 21 | Cloud Stones | Castle Road | Clear every stage within 130 seconds | – |
| 22 | Keeper's Locks | Castle Road | Clear every stage within 88 seconds | – |
| 23 | Shellfire Yard | Castle Road | Clear every stage within 169 seconds | – |
| 24 | The Last Bell | Castle Road | Clear every stage within 232 seconds | – |
| 25 | Castle Heart | Castle Road | Win using at most 70 bombs | Thorn Guard |
Level by level
"New here" lists what a level shows you for the first time: board tiles, power-ups and enemies.
Each level has its map, seen from above with north at the top, drawn straight from the game's level data. Walls, gaps, start points, switches and other special tiles are where the game puts them. On levels 1 to 20 the crates are different every round: the game scatters them at random, so the map shows the spots where a crate can appear. Castle Road levels (21 to 25) are built by hand, crates included, so their maps show every stage exactly.
Level 1: It All Starts with a BOOM
- Stars: ★ Win · ★ Win without taking a hit · ★ Collect 1 power-ups
- Enemies: 1× Twig Scout
- New here: Extra Bomb, Fire Range +1, Twig Scout
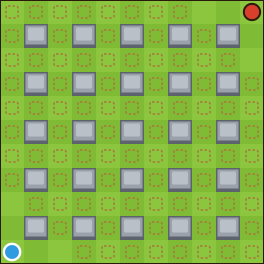
- Floor
- Wall (cannot be blasted)
- Crate spot: each round, crates fill about 65% of these at random
- You start here
- Enemy
Level 2: Crumbly Cliffs
- Stars: ★ Win · ★ Win without taking a hit · ★ Destroy every crate
- Enemies: 2× Twig Scout
- New here: Speed
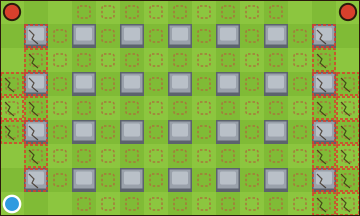
- Floor
- Wall (cannot be blasted)
- Crate spot: each round, crates fill about 65% of these at random
- You start here
- Enemy
- Ground that falls away later
Level 3: Bramble Crossing
- Stars: ★ Win · ★ Win without taking a hit · ★ Reach a total score of 5,500
- Enemies: 2× Twig Scout, 1× Burr Bomber
- New here: Kick, Heart, Burr Bomber
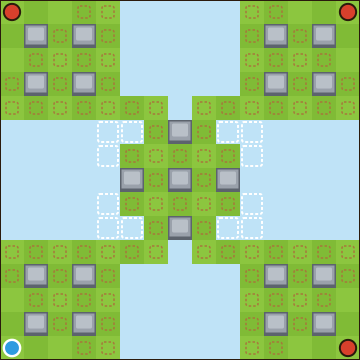
- Floor
- Wall (cannot be blasted)
- Gap (no ground)
- Crate spot: each round, crates fill about 65% of these at random
- You start here
- Enemy
- Ground that appears later
Level 4: Slip-Slide Ring
- Stars: ★ Win · ★ Win without taking a hit · ★ Win using at most 15 bombs
- Enemies: 2× Twig Scout
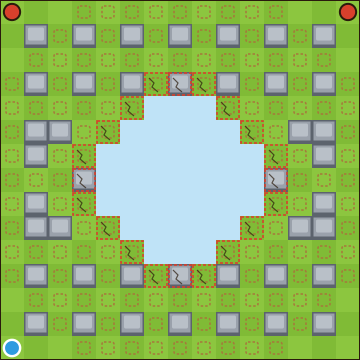
- Floor
- Wall (cannot be blasted)
- Gap (no ground)
- Crate spot: each round, crates fill about 65% of these at random
- You start here
- Enemy
- Ground that falls away later
Not on the map: rows that shift during the round are not drawn.
Level 5: The Big Hatch
- Stars: ★ Win · ★ Win without taking a hit · ★ Win within 120 seconds
- Enemies: 2× Twig Scout
- Also here: Thorn Guard
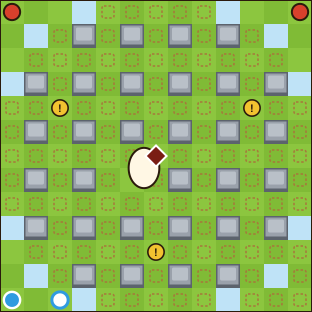
- Floor
- Wall (cannot be blasted)
- Gap (no ground)
- Crate spot: each round, crates fill about 65% of these at random
- You start here
- Enemy
- Boss
- Helper hero
- Boss egg
- Boss switch
Level 6: Rising Bridges
- Stars: ★ Win · ★ Win without taking a hit · ★ Reach a total score of 6,000
- Enemies: 2× Burr Bomber
- New here: Armor, Ice Bomb
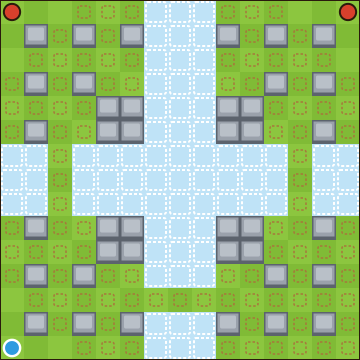
- Floor
- Wall (cannot be blasted)
- Gap (no ground)
- Crate spot: each round, crates fill about 65% of these at random
- You start here
- Enemy
- Ground that appears later
Not on the map: random tiles fall during the round (never the same ones), so they are not drawn.
Level 7: Lobber's Loop
- Stars: ★ Win · ★ Win without taking a hit · ★ Destroy every crate
- Enemies: 2× Twig Scout, 1× Bramble Lobber
- New here: Fire Bomb, Bomb Down, Fire Range -1, Speed Down, Bramble Lobber
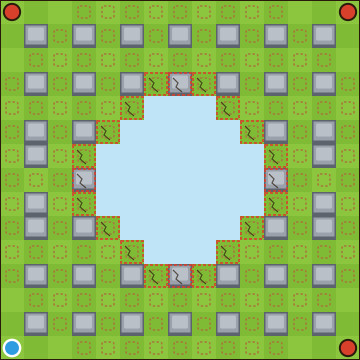
- Floor
- Wall (cannot be blasted)
- Gap (no ground)
- Crate spot: each round, crates fill about 65% of these at random
- You start here
- Enemy
- Ground that falls away later
Not on the map: rows that shift during the round are not drawn; random tiles fall during the round (never the same ones), so they are not drawn.
Level 8: Wobble Bridge
- Stars: ★ Win · ★ Win without taking a hit · ★ Win using at most 20 bombs
- Enemies: 1× Twig Scout, 1× Burr Bomber, 1× Bramble Lobber
- New here: Lightning Strike, Surprise Box, Broken Shield
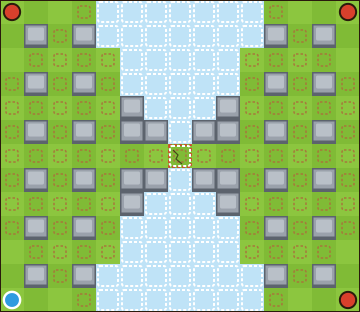
- Floor
- Wall (cannot be blasted)
- Gap (no ground)
- Crate spot: each round, crates fill about 65% of these at random
- You start here
- Enemy
- Ground that appears later
- Ground that falls away later
Not on the map: random tiles fall during the round (never the same ones), so they are not drawn.
Level 9: Bridge of Bombs
- Stars: ★ Win · ★ Win without taking a hit · ★ Reach a total score of 6,000
- Enemies: 2× Burr Bomber, 1× Bramble Lobber
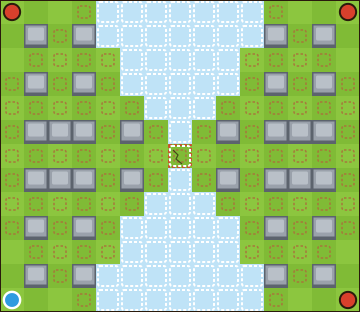
- Floor
- Wall (cannot be blasted)
- Gap (no ground)
- Crate spot: each round, crates fill about 65% of these at random
- You start here
- Enemy
- Ground that appears later
- Ground that falls away later
Not on the map: random tiles fall during the round (never the same ones), so they are not drawn.
Level 10: Shield of Thorns
- Stars: ★ Win · ★ Win without taking a hit · ★ Win within 150 seconds
- Enemies: 1× Twig Scout, 1× Burr Bomber, 1× Bramble Lobber
- Also here: Thorn Guard
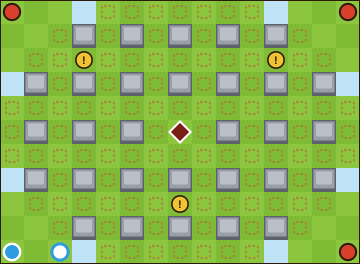
- Floor
- Wall (cannot be blasted)
- Gap (no ground)
- Crate spot: each round, crates fill about 65% of these at random
- You start here
- Enemy
- Boss
- Helper hero
- Boss switch
Level 11: Leap of Faith
- Stars: ★ Win · ★ Win without taking a hit · ★ Win using at most 16 bombs
- Enemies: 1× Twig Scout, 1× Burr Bomber, 1× Bramble Lobber
- New here: Bridge Switch
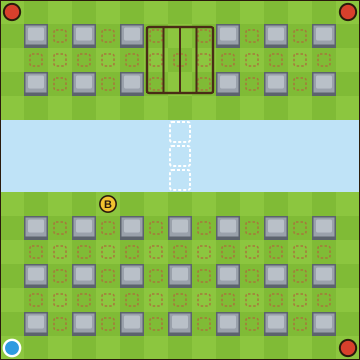
- Floor
- Wall (cannot be blasted)
- Gap (no ground)
- Crate spot: each round, crates fill about 35% of these at random
- You start here
- Enemy
- Cage
- Bridge switch
- Ground that appears later
Not on the map: random tiles fall during the round (never the same ones), so they are not drawn.
Level 12: Rolling Meadow
- Stars: ★ Win · ★ Win without taking a hit · ★ Reach a total score of 6,500
- Enemies: 2× Burr Bomber, 1× Bramble Lobber
- New here: Conveyor Belts
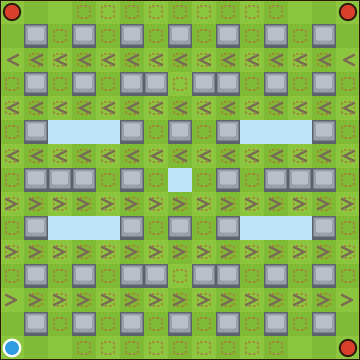
- Floor
- Wall (cannot be blasted)
- Gap (no ground)
- Crate spot: each round, crates fill about 65% of these at random
- You start here
- Enemy
- Conveyor belt (pushes this way)
Level 13: Ring by Ring
- Stars: ★ Win · ★ Win without taking a hit · ★ Win within 150 seconds
- Enemies: 1× Twig Scout, 2× Bramble Lobber
- New here: Shrinking Ring
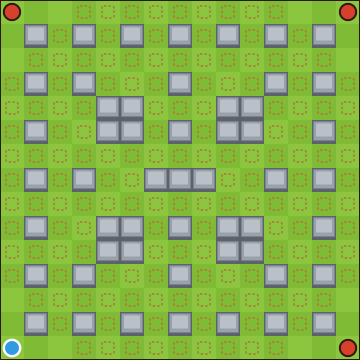
- Floor
- Wall (cannot be blasted)
- Crate spot: each round, crates fill about 65% of these at random
- You start here
- Enemy
Not on the map: the ring of ground that falls away from the edge during the round is not drawn; random tiles fall during the round (never the same ones), so they are not drawn.
Level 14: Raise the Bridge
- Stars: ★ Win · ★ Win without taking a hit · ★ Destroy every crate
- Enemies: 1× Bramble Lobber, 2× Burr Bomber
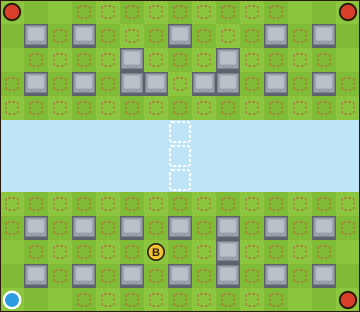
- Floor
- Wall (cannot be blasted)
- Gap (no ground)
- Crate spot: each round, crates fill about 65% of these at random
- You start here
- Enemy
- Bridge switch
- Ground that appears later
Not on the map: random tiles fall during the round (never the same ones), so they are not drawn.
Level 15: Airship Attack
- Stars: ★ Win · ★ Win without taking a hit · ★ Collect 5 power-ups
- Enemies: 3× Burr Bomber
- Also here: Airship
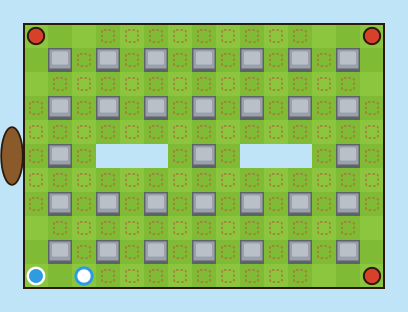
- Floor
- Wall (cannot be blasted)
- Gap (no ground)
- Crate spot: each round, crates fill about 65% of these at random
- You start here
- Enemy
- Helper hero
- Airship side
Not on the map: random tiles fall during the round (never the same ones), so they are not drawn.
Level 16: Pond Gates
- Stars: ★ Win · ★ Win without taking a hit · ★ Reach a total score of 6,500
- Enemies: 1× Burr Bomber, 2× Bramble Lobber
- New here: Timed Gate, Cage
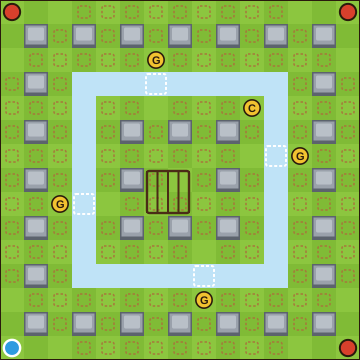
- Floor
- Wall (cannot be blasted)
- Gap (no ground)
- Crate spot: each round, crates fill about 65% of these at random
- You start here
- Enemy
- Cage
- Cage switch
- Gate switch
- Ground that appears later
Not on the map: random tiles fall during the round (never the same ones), so they are not drawn.
Level 17: Flip-Flop Lanes
- Stars: ★ Win · ★ Win without taking a hit · ★ Win using at most 18 bombs
- Enemies: 1× Burr Bomber, 2× Bramble Lobber
- New here: Reverse Switch
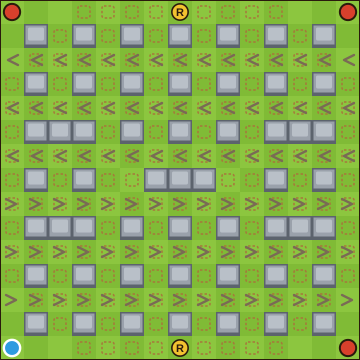
- Floor
- Wall (cannot be blasted)
- Crate spot: each round, crates fill about 65% of these at random
- You start here
- Enemy
- Reverse switch (turns the belts)
- Conveyor belt (pushes this way)
Level 18: Drawbridge Keep
- Stars: ★ Win · ★ Win without taking a hit · ★ Win within 140 seconds
- Enemies: 2× Bramble Lobber, 1× Burr Bomber
- New here: Number Plates
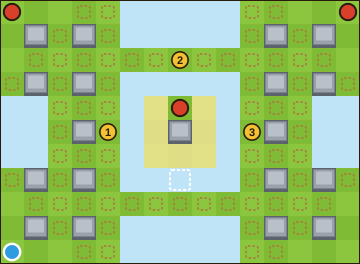
- Floor
- Wall (cannot be blasted)
- Gap (no ground)
- Crate spot: each round, crates fill about 50% of these at random
- You start here
- Enemy
- Switch in order (1, 2, 3)
- Vault (power-ups inside)
- Ground that appears later
Not on the map: random tiles fall during the round (never the same ones), so they are not drawn.
Level 19: Tower Road
- Stars: ★ Win · ★ Win without taking a hit · ★ Reach a total score of 7,500
- Enemies: 1× Bramble Lobber, 1× Bramble Lobber, 1× Bramble Lobber
- New here: Moving Ground
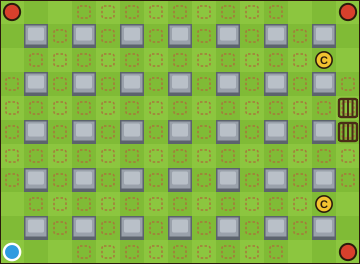
- Floor
- Wall (cannot be blasted)
- Crate spot: each round, crates fill about 65% of these at random
- You start here
- Enemy
- Cage
- Cage switch
Not on the map: some enemies enter later (from a cage or as the ground scrolls) rather than from a start point; the ground scrolls during the round: this is the starting board.
Level 20: Tower of Rage
- Stars: ★ Win · ★ Win without taking a hit · ★ Win within 270 seconds
- Enemies: 2× Twig Scout, 2× Twig Scout
- Also here: Thorn Guard, Rage Tower, Airship
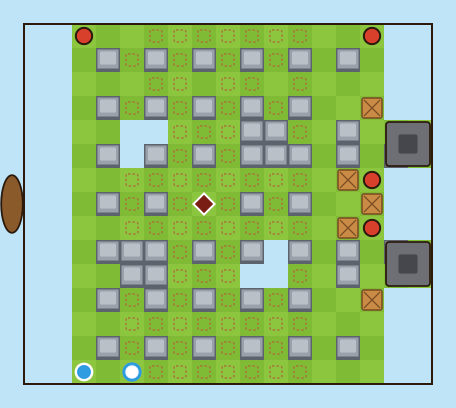
- Floor
- Wall (cannot be blasted)
- Crate (placed by the level)
- Gap (no ground)
- Crate spot: each round, crates fill about 53% of these at random
- You start here
- Enemy
- Boss
- Helper hero
- Tower
- Airship side
Level 21: Cloud Stones
- Stars: ★ Win · ★ Win without taking a hit · ★ Clear every stage within 130 seconds
- Castle puzzle: 3 stages. Stage 1: Gate opens: build the two-tile bridge and push a block onto the plate. Then walk out the east gate. · Stage 2: Gate opens: push a block onto each plate and defeat both guards. The gate is on the east wall. · Stage 3: Gate opens: build the three-tile causeway, push a block onto the far plate, defeat the guards.
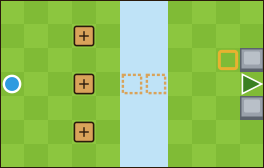
- Floor
- Wall (cannot be blasted)
- Gap (no ground)
- You start here
- Push block
- Catch socket (push a block in to make a bridge)
- Weight plate
- Exit
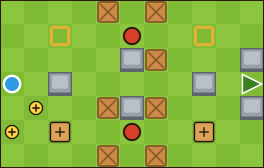
- Floor
- Wall (cannot be blasted)
- Crate (placed by the level)
- You start here
- Enemy
- Push block
- Weight plate
- Exit
- Power-up
Not on the map: during the fight the ground crumbles away from the start towards the exit.
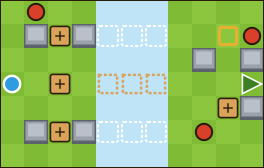
- Floor
- Wall (cannot be blasted)
- Gap (no ground)
- You start here
- Enemy
- Push block
- Catch socket (push a block in to make a bridge)
- Weight plate
- Exit
- Ground that appears later
Level 22: Keeper's Locks
- Stars: ★ Win · ★ Win without taking a hit · ★ Clear every stage within 88 seconds
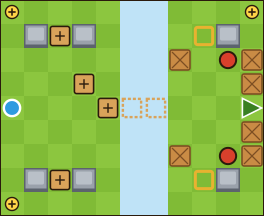
- Castle puzzle: 3 stages. Stage 1: Gate opens: hold all three locks down with blocks at once. Then walk out the east gate. · Stage 2: Gate opens: hold all three locks down and defeat the guard. · Stage 3: Gate opens: fill the two-tile bridge, hold both locks down and defeat both guards.
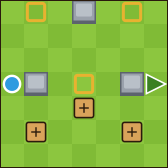
- Floor
- Wall (cannot be blasted)
- You start here
- Push block
- Weight plate
- Exit
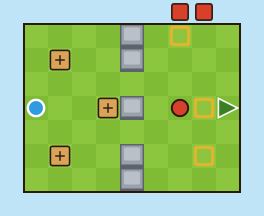
- Floor
- Wall (cannot be blasted)
- You start here
- Enemy
- Cobblewatch (on the wall)
- Push block
- Weight plate
- Exit
Not on the map: during the fight the ground crumbles away from the start towards the exit.
- Floor
- Wall (cannot be blasted)
- Crate (placed by the level)
- Gap (no ground)
- You start here
- Enemy
- Push block
- Catch socket (push a block in to make a bridge)
- Weight plate
- Exit
- Power-up
Not on the map: during the fight the ground crumbles away from the start towards the exit.
Level 23: Shellfire Yard
- Stars: ★ Win · ★ Win without taking a hit · ★ Clear every stage within 169 seconds
- Castle puzzle: 3 stages. Stage 1: Gate opens: defeat the Shellback. Hit it while it walks. · Stage 2: Gate opens: a block on both plates and both Shellbacks defeated. · Stage 3: Gate opens: a block on the plate, the moat bridged and both Shellbacks defeated.
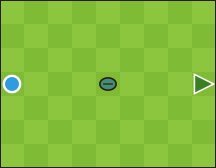
- Floor
- You start here
- Shellback
- Exit
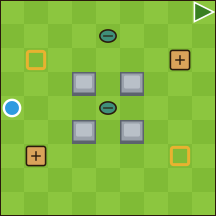
- Floor
- Wall (cannot be blasted)
- You start here
- Shellback
- Push block
- Weight plate
- Exit
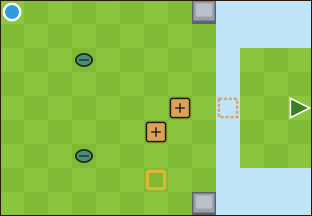
- Floor
- Wall (cannot be blasted)
- Gap (no ground)
- You start here
- Shellback
- Push block
- Catch socket (push a block in to make a bridge)
- Weight plate
- Exit
Level 24: The Last Bell
- Stars: ★ Win · ★ Win without taking a hit · ★ Clear every stage within 232 seconds
- Castle puzzle: 3 stages. Stage 1: Gate opens: step on the glowing rune to ring the bell. Its gate opens briefly. Defeat the guard. · Stage 2: Gate opens: step on glowing runes to ring the bell and open their colour's gate. Defeat both guards. · Stage 3: Gate opens: step on glowing runes to ring the bell and open their colour's gate. Defeat 3 guards.
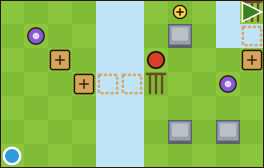
- Floor
- Wall (cannot be blasted)
- Gap (no ground)
- You start here
- Enemy
- Push block
- Catch socket (push a block in to make a bridge)
- Rune
- Timed gate
- Exit
- Power-up
Not on the map: during the fight the ground crumbles away from the start towards the exit.
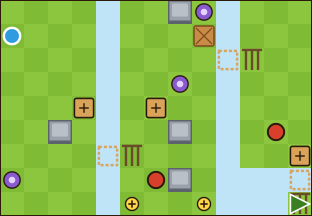
- Floor
- Wall (cannot be blasted)
- Crate (placed by the level)
- Gap (no ground)
- You start here
- Enemy
- Push block
- Catch socket (push a block in to make a bridge)
- Rune
- Timed gate
- Exit
- Power-up
Not on the map: during the fight the ground crumbles away from the start towards the exit.
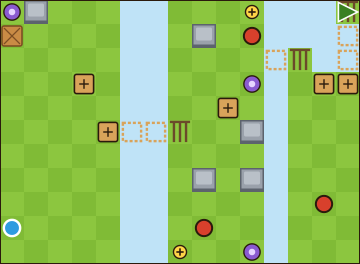
- Floor
- Wall (cannot be blasted)
- Crate (placed by the level)
- Gap (no ground)
- You start here
- Enemy
- Push block
- Catch socket (push a block in to make a bridge)
- Rune
- Timed gate
- Exit
- Power-up
Not on the map: during the fight the ground crumbles away from the start towards the exit.
Level 25: Castle Heart
- Stars: ★ Win · ★ Win without taking a hit · ★ Win using at most 70 bombs
- Also here: Thorn Guard
- Castle puzzle: 2 stages. Stage 1: Main gate opens: defeat the guards and towers, a block on the plate, a bridged gap, both runes lit. · Stage 2: Throne gate opens: destroy the two towers on the sides, the guards and both Shellbacks, then defeat Thorn Guard.
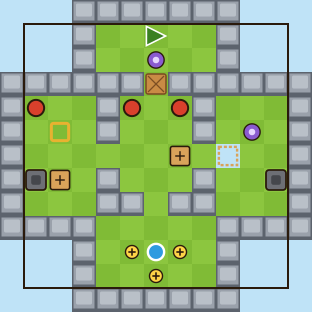
- Floor
- Wall (cannot be blasted)
- Crate (placed by the level)
- Gap (no ground)
- You start here
- Enemy
- Tower
- Push block
- Catch socket (push a block in to make a bridge)
- Weight plate
- Rune
- Exit
- Power-up
Not on the map: the final battle's refuge cells and where the blocks rest after the puzzle are not drawn.
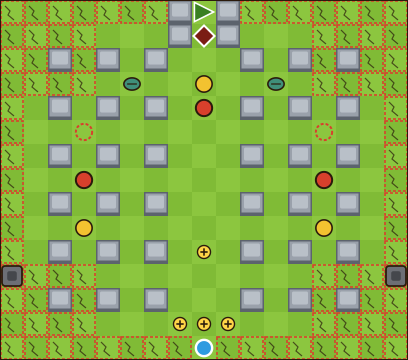
- Floor
- Wall (cannot be blasted)
- You start here
- Enemy
- Enemy that joins later
- Boss
- Shellback
- Tower
- Switch
- Exit
- Power-up
- Ground that falls away later
Not on the map: crates are thrown onto the board during the fight.
Every number on this page comes from the game's own data for version 1.0. Something wrong? Mail support@boombaland.com.